The services gateway is shipped with the Juniper Networks Junos operating system (Junos OS) preinstalled and ready to be configured when the device is powered on. You can perform the initial software configuration of the services gateway by using the browser-based setup wizard or by using the command-line interface (CLI).
Before configuring the device, gather the configuration information required to deploy the device in your network. At a minimum, the setup wizard requires the following information:
Device name
Password for the root user
Time information for the services gateway location
Configuring Zero-Touch Provisioning on SRX Series Devices
Zero Touch Provisioning (ZTP) enables you to complete the initial configuration of the services gateway in your network automatically, with minimum intervention. Network Service Controller is a component of the Juniper Networks Contrail Service Orchestration platform that simplifies and automates the design and implementation of custom network services that use an open framework. For more information, refer to the Network Service Controller section in the datasheet at https://www.juniper.net/assets/us/en/local/pdf/ datasheets/1000559-en.pdf .
NOTE
To complete the ZTP process, ensure that the services gateway is connected to the Internet.
To configure the device automatically using ZTP:
Access the J-Web interface (https://192.168.1.1).
If you already have the authentication code, enter the code in the webpage displayed.
On successful authentication, the initial configuration is applied and committed on the services gateway. Optionally, the latest Junos OS image is installed on the device before the initial configuration is applied.
When the process is complete, the message Device activation complete. Please disconnect your laptop. is displayed
If you do not have the authentication code, you can use the J-Web setup wizard to configure the services gateway. Click Skip to J-Web, enter a root authentication password, and configure the services gateway.
Accessing J-Web on the SRX320 Services Gateway
The J-Web interface is a Web-based graphical interface that allows you to operate a services gateway without commands.
NOTE
To access the J-Web interface, your management device requires one of the following supported browsers:
For Junos OS Release 15.1X49-D30 through Junos OS Release 15.1X49-D90, and Junos OS Release 17.3R1:
Microsoft Internet Explorer version 9 or 10
Mozilla Firefox version 38 (or later)
For Junos OS Release 15.1X49-D100:
Microsoft Internet Explorer version 10 or 11
Mozilla Firefox version 44 (or later)
Google Chrome version 55 (or later)
To access J-Web:
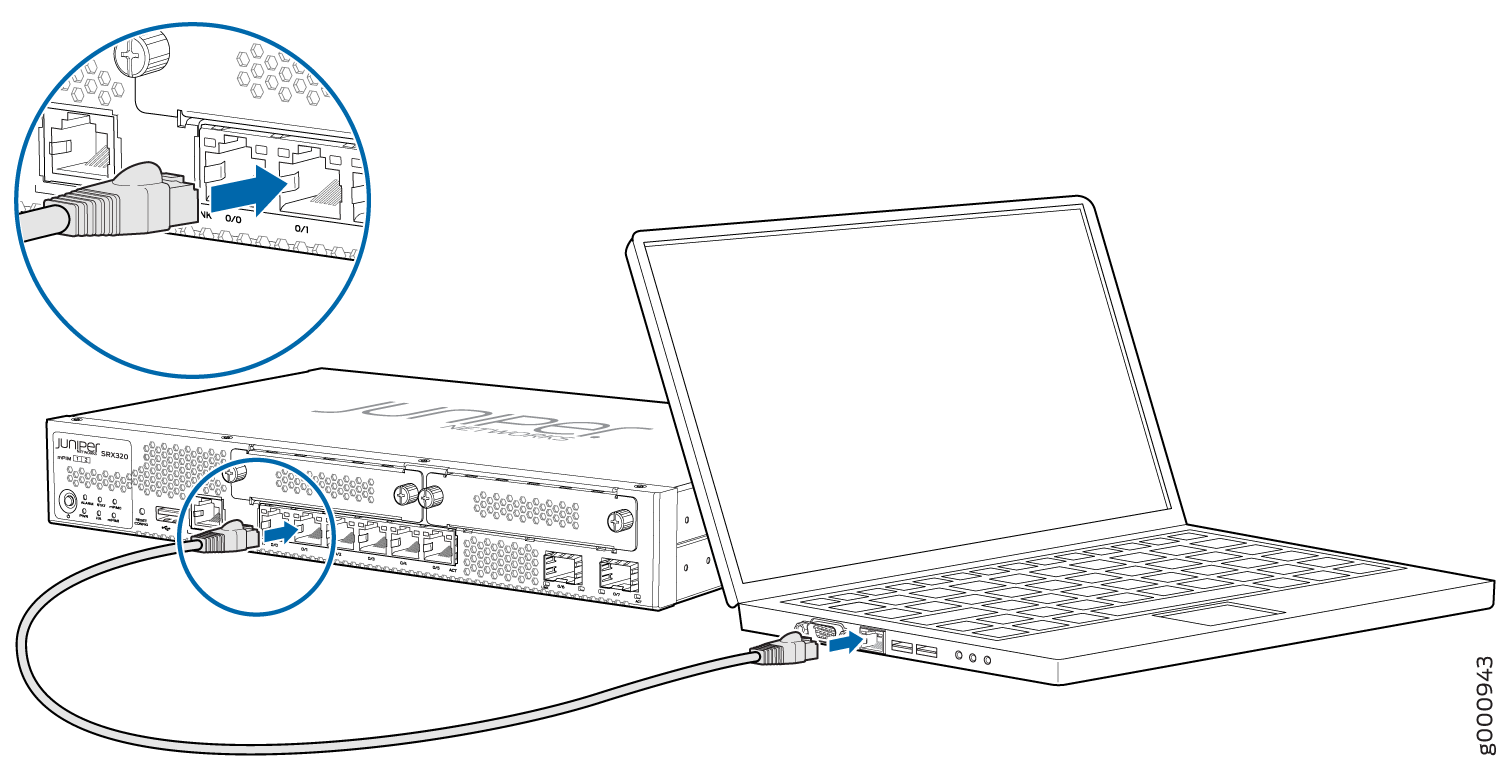
Connect any of the network ports numbered 0/1 through 0/5 to the Ethernet port on the management device, using an RJ-45 cable. Figure 1: Connecting to the Ethernet Port on the SRX320 Services Gateway
The services gateway functions as a DHCP server and automatically assigns an IP address to the management device. Ensure that the management device acquires an IP address on the 192.168.1.0/24 subnetwork from the device.
If an IP address is not assigned to the management device, manually configure an IP address in the 192.168.1.0/24 subnetwork. Do not assign the 192.168.1.1 IP address to the management device, as this IP address is assigned to the services gateway. By default, the DHCP server is enabled on the L3 VLAN interface, irb.0 (interface ge-0/0/1 to ge-0/0/5). which is configured with an IP address of 192.168.1.1/24.
Open a Web browser on the management device and enter the IP address http://192.168.1.1 in the address field.
Configuring the SRX320 Services Gateway Using the J-Web Setup Wizard
This topic describes how to perform the initial software configuration of your services gateway using the setup wizard.
The setup wizard guides you through the step-by-step configuration of a services gateway that can securely pass traffic. To help guide you through the process, the wizard:
Provides recommended settings based on your previous selections. For example, the wizard recommends security policies based on the security topology you have defined.
Determines which configuration tasks to present to you based on your selections.
Flags any missing required configuration when you attempt to leave a page.
Indicates which configuration elements or tasks are unavailable to you based on your previous selections by graying them out.
You can choose one of the following setup modes to configure the services gateway:
Default Setup mode—This mode allows you to quickly set up a services gateway in a default security configuration. In this mode, you can configure basic system settings, such as the administrator password, and download purchased licenses. Any additional configuration can be carried out after completing the wizard setup.
Guided Setup mode—This mode allows you to set up a services gateway in a custom security configuration.
NOTE
It is mandatory to configure only the device name and root password. You can skip all the other steps by clicking Next to go directly to the Confirm & Apply page to apply the configuration.
About the Default Setup Mode
If you choose the Default Setup mode, the wizard takes you through the minimal configuration needed to set up the services gateway that can securely pass traffic in the default configuration.
In the Default Setup mode, you configure:
Device name
Password for the root account
Time information for the services gateway location:
Local time zone
Name or IP address of a Network Time Protocol (NTP) server, if NTP is used to set the time on the services gateway
Local date and time if an NTP server is not used to set the time
You cannot do additional configuration in the Default Setup mode. You must commit your changes and exit the wizard to perform any additional configuration. You can perform additional configuration by rerunning the wizard in the Guided Setup mode, by using the J-Web interface, or by using the CLI.
See the How to Set Up Your SRX320 Services Gateway for step-by-step instructions on how to configure your services gateway in the Default Setup mode.
About the Guided Setup Mode
If you choose the Guided Setup mode, the wizard guides you through configuring your services gateway in a custom security configuration. You can choose between the Basic and Expert levels based on your experience level. The following table compares the Basic and Expert levels.
Basic
Expert
Can configure only three internal zones
Can configure more than three internal zones
Can configure static and dynamic IP for the Internet zone
Can configure static IP, static pool, and dynamic IP for the Internet zone
Can configure internal zone service
Can configure internal zone service
Cannot configure internal destination NAT
Can configure internal destination NAT
Configurations you can perform with the setup wizard include:
Configuring basic options such as device name, root password, and system time
Configuring the security topology
Internet zone
Internal zones
DMZ
Defining security policies and Network Address Translation (NAT) rules
Configuring remote access
NOTE
Before applying the configuration changes to the services gateway, check the connectivity to the services gateway. You might lose connectivity if you have changed the management zone IP. Click the URL for reconnection instructions for information on how to reconnect to the device.
After you finish configuring the services gateway with the setup wizard and commit your configuration, you are redirected to the J-Web interface. Thereafter, whenever you connect to the services gateway, you are placed in the J-Web interface. You can access the setup wizard from the J-Web interface and use it to reconfigure your services gateway. To do so, select Configure > Device Setup > Set Up. You can either edit an existing configuration or create a new configuration.
NOTE
If you elect to create a new configuration, then all the current configuration in the services gateway will be deleted.
Accessing the CLI on the SRX320 Services Gateway
To access the CLI on the SRX320 Services Gateway:
Plug one end of the Ethernet cable into the RJ-45 to DB-9 serial port adapter supplied with your services gateway.
Plug the RJ-45 to DB-9 serial port adapter into the serial port on the management device.
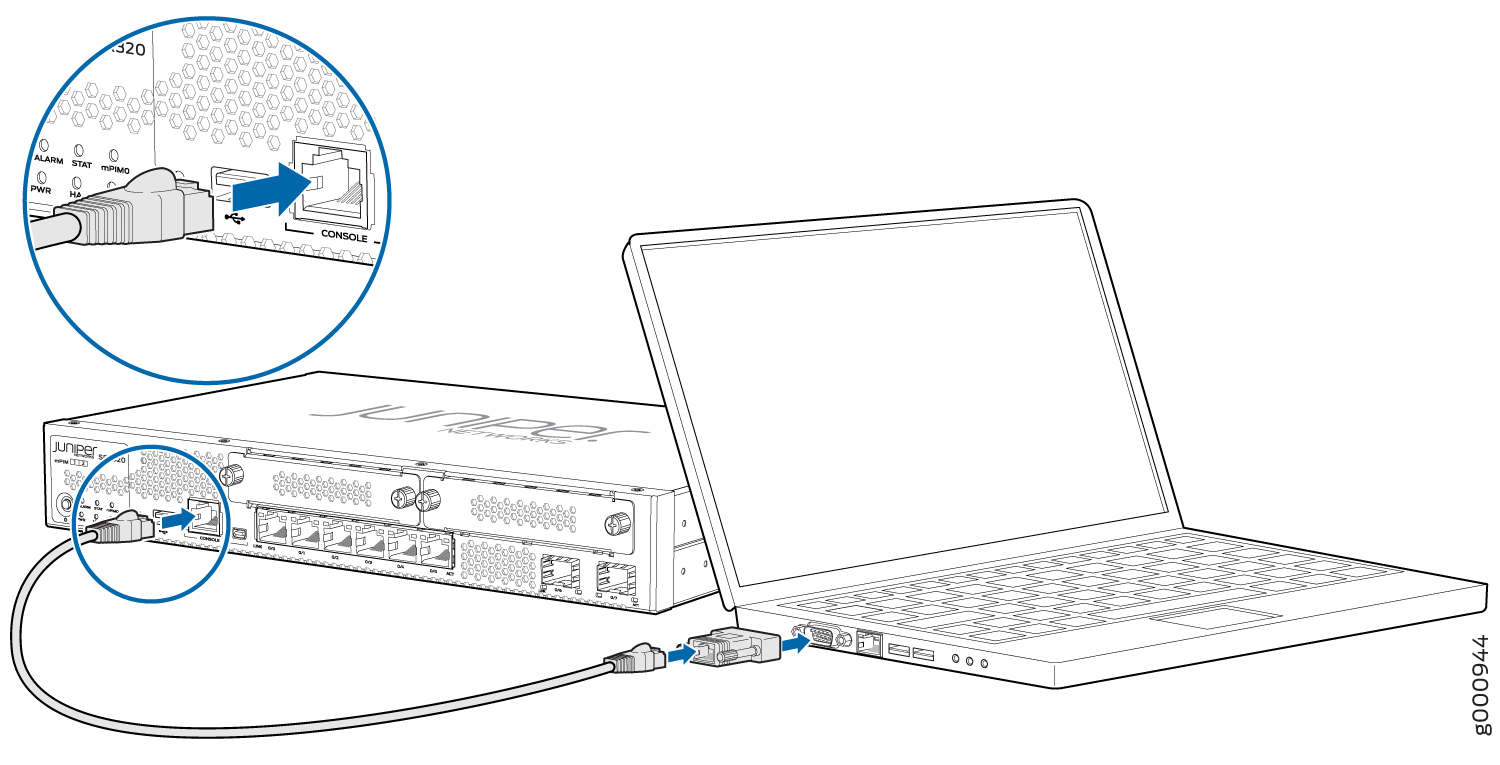
Connect the other end of the Ethernet cable to the serial console port on the services gateway.
NOTE
Alternately, you can use the USB cable to connect to the mini-USB console port on the services gateway. To use the mini-USB console port, you must download a USB driver to the management device from the SRX320 Software Download page or Silicon Labs page.
Figure 2: Connecting to the Console Port on the SRX320 Services Gateway
Start your asynchronous terminal emulation application (such as Microsoft Windows HyperTerminal) and select the appropriate COM port to use (for example, COM1).
Configure the serial port settings with the following values:
Baud rate—9600
Parity—N
Data bits—8
Stop bits—1
Flow control—none
Power on the services gateway. You can start performing initial software configuration on the services gateway after the device is up.
Connecting to the SRX320 Services Gateway from the CLI Remotely
You can connect an SRX320 Services Gateway to the CLI from a remote location through two dial-up modems:
A modem that is connected to the console port on the services gateway
A second modem connected to a remote management device
The modem connection allows you to remotely perform the same console operations that you can perform locally.
Configuring the SRX320 Services Gateway Using the CLI
This procedure connects the device to the network but does not enable it to forward traffic. For complete information about enabling the device to forward traffic, including examples, see the appropriate Junos OS configuration guides.
To configure the software:
Verify that the device is powered on.
Log in as the root user. There is no password.
Start the CLI.
content_copyzoom_out_map
root@%cli
root>
Enter configuration mode.
content_copyzoom_out_map
configure
[edit]
root#
Set the root authentication password by entering a cleartext password, an encrypted password, or an SSH public key string (DSA or RSA).
content_copyzoom_out_map
[edit]
root# set system root-authentication plain-text-password
New password: password
Retype new password: password
Configure an administrator account on the device.
content_copyzoom_out_map
[edit]
root# set system login user admin class super-user authentication plain-text-password
Commit the configuration to activate it on the device.
Log in as the administrative user you configured in Step 6.
Configure the name of the device. If the name includes spaces, enclose the name in quotation marks (“ ”).
content_copyzoom_out_map
configure
[edit]
admin# set system host-namehost-name
Configure the traffic interface.
content_copyzoom_out_map
[edit]
admin# set interfaces ge-0/0/1 unit 0 family inet address address/prefix-length
Configure the default route.
content_copyzoom_out_map
[edit]
admin# set routing-options static route 0.0.0.0/0 next-hop gateway
Configure basic security zones and bind them to traffic interfaces.
content_copyzoom_out_map
[edit]
admin# set security zones security-zone untrust interfaces ge-0/0/0
admin# set security zones security-zone trust interfaces ge-0/0/1
admin# set security zones security-zone trust interfaces ge-0/0/1.0 host-inbound-traffic system-services all
admin# set security zones security-zone trust interfaces ge-0/0/1.0 host-inbound-traffic protocols all
Configure basic security policies.
content_copyzoom_out_map
[edit]
admin# set security policies from-zone trust to-zone untrust policy policy-name match source-address any destination-address any application any
admin# set security policies from-zone trust to-zone untrust policy policy-name then permit
Create a Network Address Translation (NAT) rule for source translation of all Internet-bound traffic.
content_copyzoom_out_map
[edit]
admin# set security nat source rule-set interface-nat from zone trust
admin# set security nat source rule-set interface-nat to zone untrust
admin# set security nat source rule-set interface-nat rule rule1 match source-address 0.0.0.0/0 destination-address 0.0.0.0/0
admin# set security nat source rule-set interface-nat rule rule1 then source-nat interface
Check the configuration for validity.
content_copyzoom_out_map
[edit]
admin# commit check
configuration check succeeds
Commit the configuration to activate it on the device.
content_copyzoom_out_map
[edit]
admin# commit
commit complete
Optionally, display the configuration to verify that it is correct.
content_copyzoom_out_map
[edit]
admin# show
Optionally, configure additional properties by adding the necessary configuration statements. Then commit the changes to activate them on the services gateway.
content_copyzoom_out_map
[edit]
admin@device# commit
When you have finished configuring the services gateway, exit configuration mode.
content_copyzoom_out_map
[edit]
admin@device# exit
admin@device>
Verifying Settings for the SRX320 Services Gateway
Access https://www.juniper.net to verify connectivity. If the page does not load, perform the following checks to see if you can identify the problem:
Check if the cable connecting the ISP-supplied device to the SRX Series device is firmly seated.
Use the CLI ping command to verify that the services gateway can be accessed from the management device.
Check if the management device has an IP address in the 192.168.1.0/24 subnetwork.
Clear the browser cache on the management device.
After you complete these steps, the device can pass traffic from any trust port to the untrust port. You can connect other devices to the SRX Series device.